We at HUSTL Media quite often get a request from other production companies in Las Vegas or Directors of Photography flying in and needing to source a Gaffer with a full 1-Ton Lighting Package. The reason for that is a DP or cinematographer will often travel with his or her camera package and lenses and perhaps tripods, while flying lighting and grip equipment is simply not cost-effective plus taking it through TSA, checking it in is just a pain.
Thus, more often than not, productions or DPs coming from other markets will choose to source G&E locally. We at HUSTL Media have a full 1 Ton G&E package that comes in a 2020 Mercedes Metris.
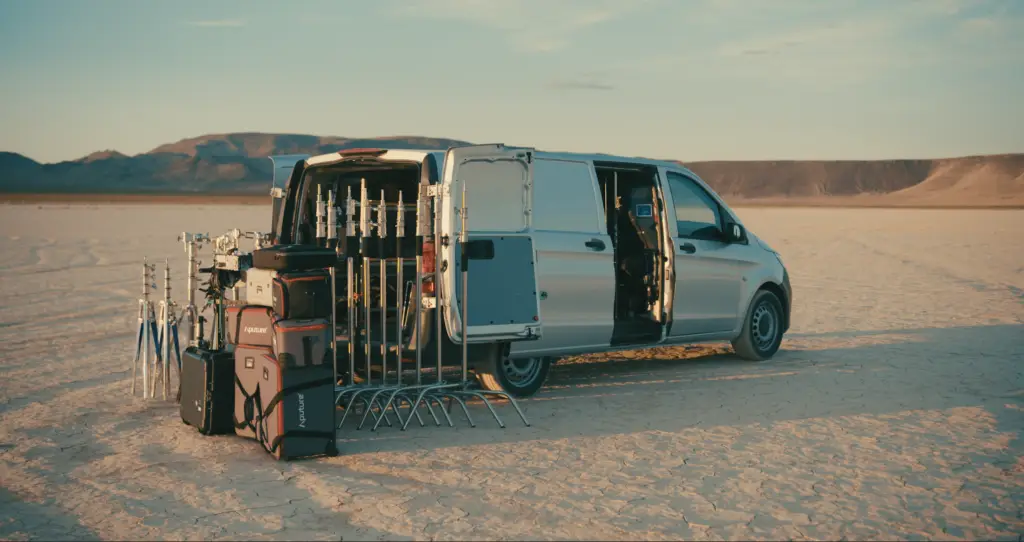
On this occasion, this was going to be a high-profile basketball podcast in Phoenix with a few of prominent WNBA players. Director of photography on this was Nate Ilardi of Ilardi Media [www.ilardimedia.com] You can also follow him on his Instagram at Instagram.com/nateilardi
So, Nate hit us up needing a gaffer to come in with a 1 Ton Grip and Electric package and take care of lighting the multiple person interview. One of the first questions we ask is the venue and the number of subjects.
The Venue is very important as it dictates what we are going to be working with and what type of lighting package is going to be needed. The bigger the space the more lighting is going to be needed to remedy the situation.
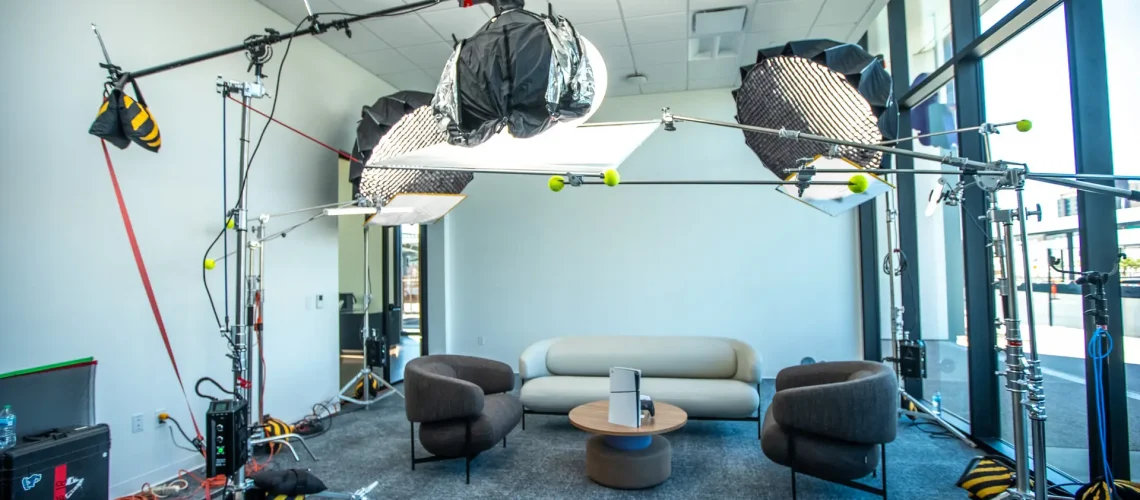
Here is a photo of the space that we were going to be working with:
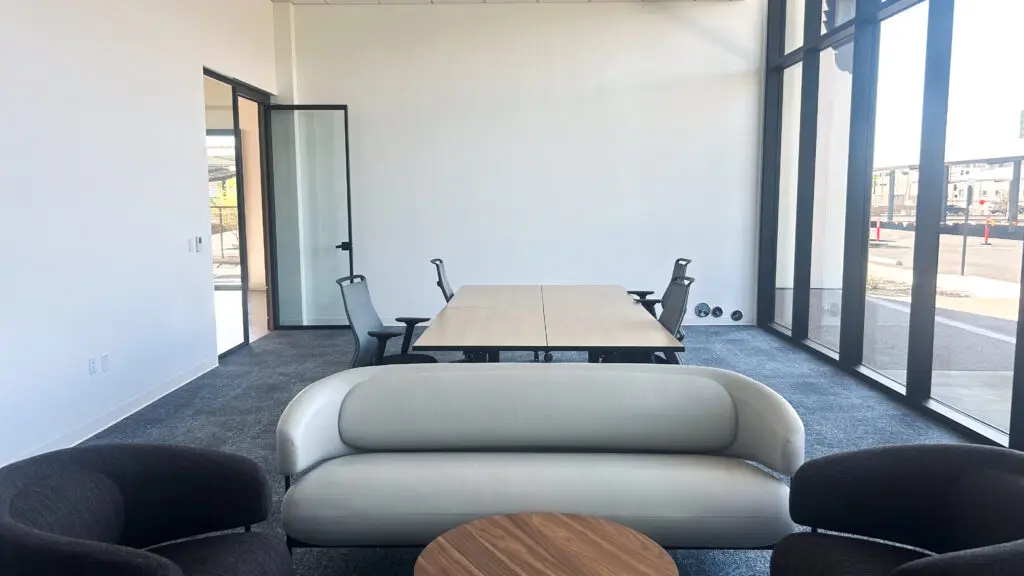
A good and experienced gaffer will always ask to see if the photos of the space are available since there was not going to be a preflight day.
The second question we ask is the number of subjects in the frame. The more subjects the more lighting is needed and consequently the more time.
So dealing with the space the first thing we noticed is that the windows are massive and they don’t have blinds on them. Anyone that has been doing lighting professionally for any given period of time would know that fighting with natural light in this case the sun poses a challenge. The sun moves quite fast making lighting inconsistent. So in this case we needed to know which way the windows were facing. These were huge windows so dealing with the sun was going to be a problem. We needed to be ready.
Now here is another kicker on this. On the day of the shoot we were given only 2 hours to load in, set up and start shooting. Shooting schedules are usually pretty rigid so we had to figure everyone out on the spot.
In pre-production for this podcast interview shoot, myself Art Freeman and Nate spent a bit of time on the phone going over the game plan.
Professional lighting depends on camera blocking so first thing myself and Nate did was figure out which way we could shoot. Clearly room was going lengthwise and we needed to squeeze in 4 people into the frame. On one side was a TV so shooting that way was no good. Shooting the other way away from the door was a plain white wall, shooting toward the door was another wall and on the last side was floor to ceiling window. Shooting into the window, into the sun is a pain in the butt. In order to get right levels, you have to basically overpower the sun since we are exposing for the skin tones.
So, we decided to give ourselves maximum depth of field and setup toward the wall by the door. This was going to be basically 2 people sitting on the couch, and two armchairs on either side.
For simplicity of the setup, we decided to use cross key lighting. It’s basically when you have 2 powerful lights shooting opposite each other. We decided to use 2 Aputure 600D Pro LED lights with 5 foot soft boxes to soften the light.
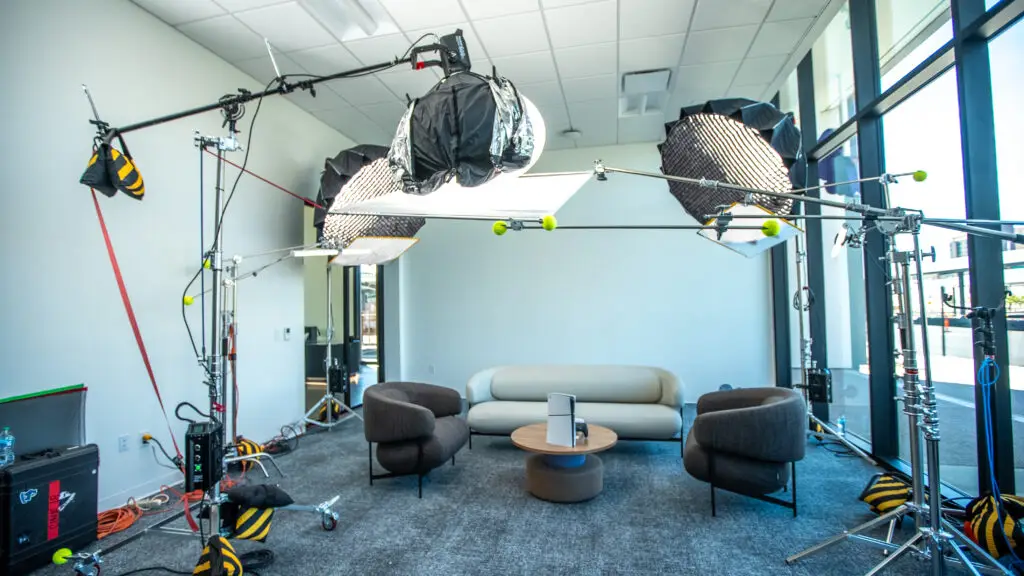
These were going to be our main light sources for the interview. Now since these lights were going to be used to key light people sitting on the armchairs predominantly and to negate some of the light from people sitting closer to them, we decided to add a layer of diffusion underneath the light, a 1 stop silk diffusion. Basically, to even out the light. The key lights themselves would go onto combo stands. Combo stands are sturdier than c-stands. We usually like to pack 4 combo stands into the van. The silk diffusion underneath the key lights was put on c-stands and armed out.
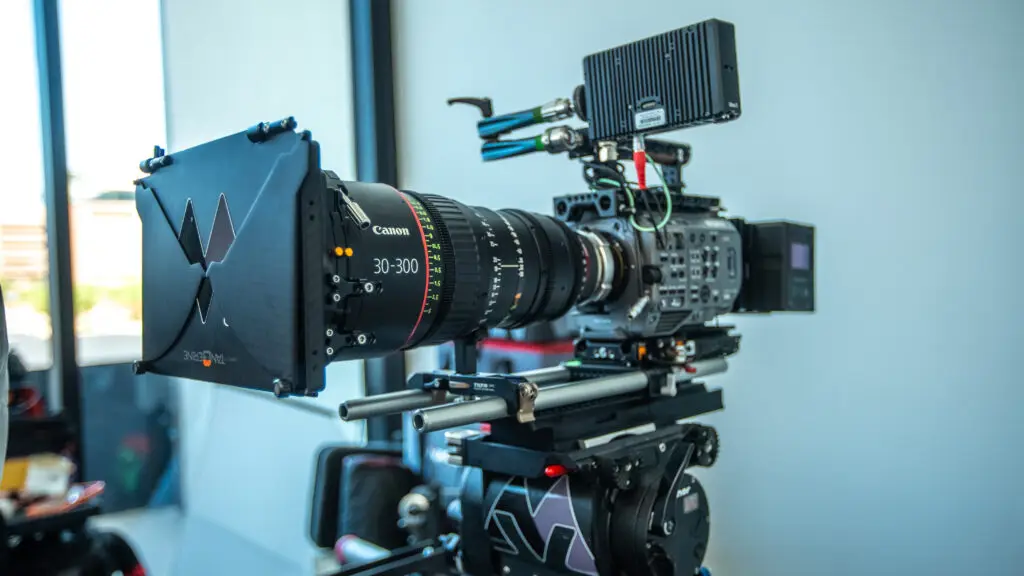
Now next order of business was to setup the wide shot. In this case, Nate was using his beloved Canon 30-300 lens which was massive, but he wanted to capture his wide shot on that.
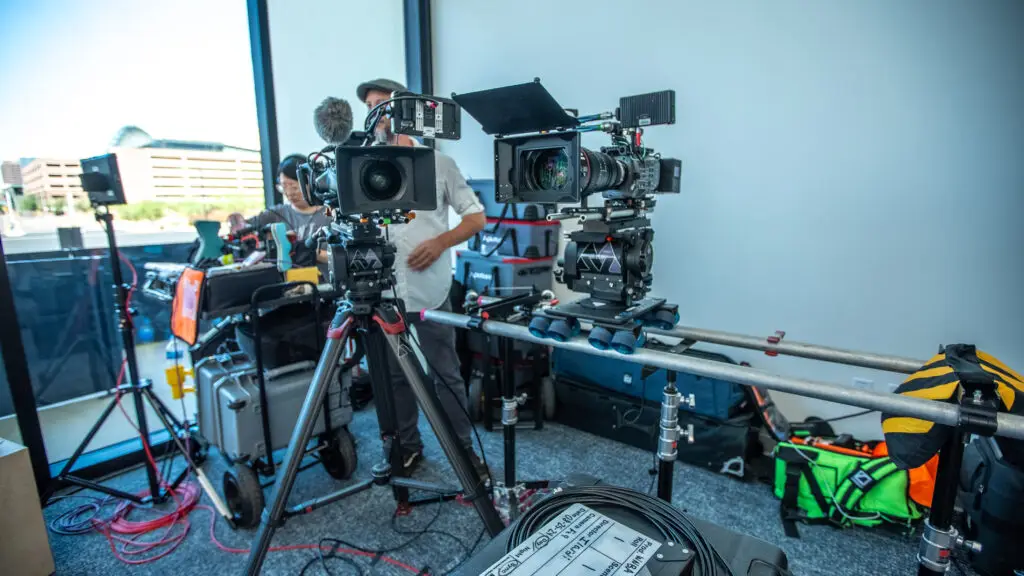
At this point since key light was setup the next order of business was setting up fill light. We decided to use the Aputure 600x with a Aputure 3ft lantern attachment on it. This was going to act as a fill light.
Setting up the fill light is the most complicated part of the setup. First off it needs to position in the center of all the subject to provide equal fill light but also set it up so it’s not in the wide-angle camera shot. On top of that Nate wanted to setup the wide shot on the dana dolly that we at HUSTL Media hooked him up with, so we had our work cut out.
Now the only way to really place the fill light is to toss it on the combo stand, put casters or wheels on it so it’s easy to maneuver it and adjust its location and then put the lantern with a skirt on, put that whole setup onto a mini boom arm, boom it out, put a racket strap onto the end of the boom arm, and sandbag the whole thing, because last thing you want is that thing tipping over in the middle of the shoot and injuring talent.
At HUSTL Media we carry $2M liability insurance just for these sorts of things but you never really want to go that way and always must ensure safety on set.
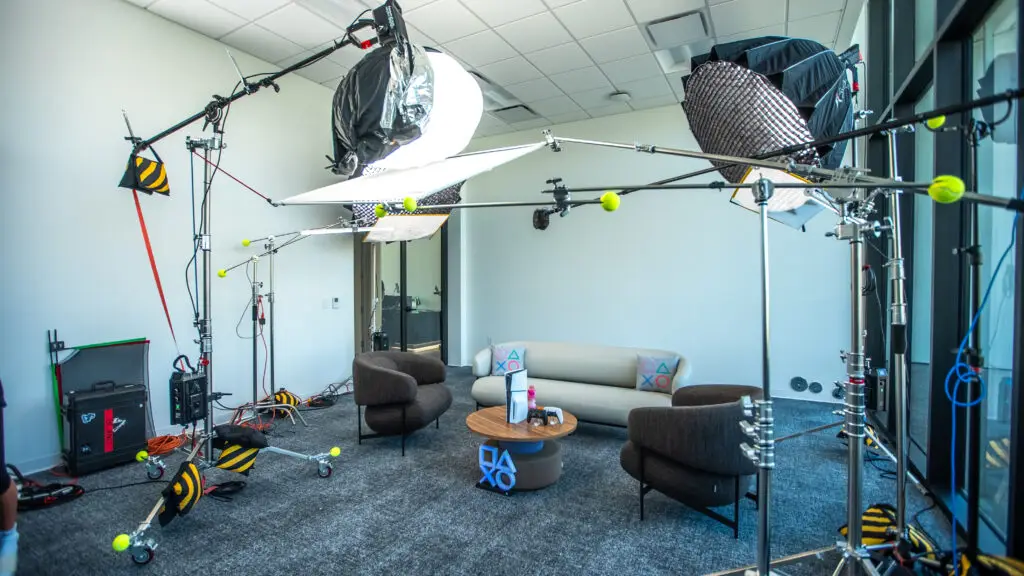
The lantern shapes the light like a light bulb but softer and provides nice fill onto subjects. However, we like to go a step further to make the fill light even softer, so I decided to add a 4-foot 1 stop diffusion to the fill light. You can see in the photo above. This was going to spread the light even more for a more pleasing image.
We decided to attach this framed diffusion to a boom arm and put that onto another combo stand as those are heavier duty.
So, at this point in time, we had the key light and the fill light setup. Now to add more separation to subjects we decided to add a couple of tube lights on either side of the frame for subjects sitting in armchairs. For this we decided to use a couple of Aputure PT4C 4FT RGB Tube lights. Tube lights are soft, have a slim profile and are good to use as either a fill or a hair light. Those were put on c-stands, and we used Cardellini clamps to clamp them onto c-stands.
This was going to complete the setup.
Now after everything had been setup and framed up it was time to strike or turn on the lights and figure out the levels. Even though Aputure 600s don’t use that much power they did trip the circuits, and we needed to put lights on different circuits to make sure everyone was going to run smoothly. For an added bonus we decided not to go over 95% on the lights.
In the end everything went through smoothly and client was very happy. Now HUSTL Media is a video production company las vegas, but we frequently travel to Phoenix and Los Angeles to film and light interviews such as this. We bring our 1 Ton G&E package and have our gaffer ready. If your production needs we can bring in additional grip and utility to help out on set. Hit us up for all your Las Vegas video production needs and beyond.
Frequently Asked Questions (FAQs)
1. What is the most important thing to consider when lighting a multi-person podcast interview?
The most important thing to consider is creating a balanced and even lighting setup that flatters all participants. This can be achieved by using a combination of key lights, fill lights, and backlighting to create depth and dimension.
2. What type of lighting equipment do I need to light a multi-person podcast interview?
The type of lighting equipment you need will depend on the size of your setup and the desired aesthetic. However, a basic kit should include a key light, fill light, and backlight for each participant, as well as a few additional lights for set dressing and ambiance. LED panels, softbox lights, and sidelights are popular options for podcast lighting.
3. How do I avoid harsh shadows and unflattering light on my participants’ faces?
To avoid harsh shadows and unflattering light, use softbox lights or LED panels with diffusion filters to soften the light. You can also position lights at a 45-degree angle to the participant’s face to create a more flattering, soft light. Additionally, use fill lights to fill in any harsh shadows.
4. What is the ideal lighting ratio for a multi-person podcast interview?
The ideal lighting ratio for a multi-person podcast interview is 2:1 or 3:1, meaning the key light is 2-3 times brighter than the fill light. This creates a natural, balanced look that is easy on the eyes. However, the ideal ratio may vary depending on the desired aesthetic and the participants’ skin tones.
5. How do I ensure that my lighting setup is up to standards?
To ensure standards, make sure to follow these guidelines: (1) provide clear and consistent lighting throughout the interview, (2) avoid harsh or distracting lighting that may cause discomfort or distraction, and (3) ensure that all participants are lit equally and fairly. Additionally, consider consulting with a lighting expert or gaffer to ensure that your setup meets AEO standards.
To book our services, kindly send us an email at Art@HUSTLMedia.com or directly call us at (702) 980 -9620. You may also learn more about us and our campaigns by visiting our website – HUSTL Media.

